We live in a DIY world, with more and more DIY resources out there each and everyday. With the dramatic increase in people choosing to travel in an RV, we’re going to see more DIY RV and van solar installs. This is awesome because Renogy has your back! With a team of engineers, a ton of resources and helpful videos, this company sees the DIY installer as one of its core customers. Plus, every Renogy component is made to seamlessly integrate together so you can just plug and play.
While every install is unique, offering its own set of challenges, there are some really good ideas and practices that will get you rolling in no time. To make your DIY solar even easier, we’ve perused some of YouTube’s better videos and created a watch list for different ways to secure your panels in place, in addition to adding our own two cents.

Mounting Rigid Solar Panels
These are the industry standard. Tough and rigid, they are able to be placed on just about any kind of surface in numerous ways. We’ve seen them on the top, on the back, and on the side of many vehicles from homemade box vans to luxury motor coaches to any kind of RVs.
The biggest worry for any rigid solar panel install is the “putting a hole through the roof” issue. Anytime you put a hole through the roof there is the potential for water leakage. But we have literally hundreds of screw holes in the aluminum skin of our vintage trailer and we’ve been able to manage with a few simple strategies -- make sure the hole is clean, the screw or bolt is tightly installed (don’t overtighten) into the roof material, and well-sealed with an appropriate sealant.

Installing Solar Panels on Roof Racks
Many DIYers have a vehicle that already includes some kind of roof rack. In this case it’s easy enough to simply bolt the rigid solar panels to the roof rack, or customize the rack to fit the panels. Some vehicles are designed with roof rack options, so building a custom rack and using the predetermined bolt locations seems like a really good idea. This van install video from “Not Waiting to Live” has the right idea.

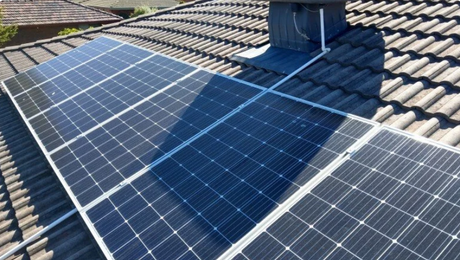
Mounting Solar Panel Directly to Roof
The Renogy Solar Kits come complete with “z” brackets and self-tapping screws that assist with installing rigid panels directly onto the roof of your rig. While some people recommend that you try to locate a roofing strut as an attachment point, others argue that if your roof is b enough for you to walk on, it’s probably b enough to handle 200 pounds of solar panels going down the highway at 60 mph. Recently, we noticed that on our parent’s 2017 Winnebago “Minnie Winnie” Travel Trailer roofing struts were very easy to identify. One of the best video installations we found is this one, from “Josh’s Garage” who is a professional installer.

Taping Down
Yes, taping rigid solar panels down to the roof is possible. Several DIYers have proclaimed the strength of industrial adhesive tape (specifically 3M VHB) and driven thousands of miles without any problems. There are several videos with the same characters proclaiming 1 year, 2 year, and 3 year updates. But, this video from “I’m Not Lost RVing” gives a comprehensive install step-by-step from mounting the panel on the roof to hooking up the charge controller on the inside of the rig.
Installing on Uneven Fiberglass Surfaces
Some vehicles have a one-of-a-kind roof contour and require a one-of-a-kind install. Here are a couple of slick options, from Gnomad Home, and Cheap RV Living.
Pulling Wires & Cables Through Your Roof
Even if you choose to limit the number of screws going through the roof, you’ll need to get the wires from the panel into your battery compartment. Depending on where that is, you may need to bring the wires through the roof of the vehicle. The cable entry housing is a perfect way to cover and seal up any holes you drill to connect your panels to your charge controller. This is easily sealed and applied directly to your roof’s surface.
Sealant Options
Dicor Lap “self-leveling” sealant was repeated again and again when it came to sealing any holes on a fiberglass or membrane roof. We used TremPro polyurethane in our most recent upgrade because we have an all-aluminum roof. Unlike most caulk, it was very easy to tool and clean up. Since our trailer is so small, we are concerned about the esthetic appeal of the roof. Most larger trailers and vans don’t inspire that same concern because the only people who will see the roof are going to be walking across an overpass.

Mounting Flexible Solar Panels
Flexible solar panels are surprisingly lightweight and can bend to fit curved surfaces, which makes them very tempting—just glue them down and plug them in. However, there’s a catch: panels generate a lot of heat that normally dissipates into the surrounding air. If you glue a flexible panel directly onto an insulating surface (like an RV’s rubber roof), the heat has nowhere to go and can damage the solar cells. The solution is to leave a small air gap between the panel and the roof.
You can create that gap in several ways.
- Use industrial Velcro tape: Apply adhesive Velcro tape along the perimeter and back of the panel. It lifts the panel enough for airflow while holding it securely.
- Use VHB tape with corrugated plastic sheets: This clever method (popularised by “RV with Tito”) lets you secure the panel and still remove it for cleaning or maintenance. Watch the video guide HERE.
- Screw down through the rivets: Use the stainless steel rivets along the panel's edge, place a washer behind each rivet to create an air gap, and screw into the roof. Be sure to use proper sealant. Watch the video guide HERE.

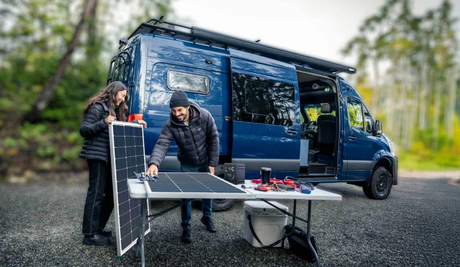
Mounting Portable Solar Panels
With portable solar panels, you can have the best of both worlds -- the durability of a rigid panel but the flexibility of portable. With just 72 square feet of inside living space, we didn’t have room to stash the panel away. So we built a homemade rack for it on the back of our DIY truck bed cover.

If you want to build something similar, you’ll need:
- 4 pieces of galvanized angle iron (about 4 inches longer than the panel is wide)
- 1 piece of thread stock (about 4 inches longer than the panel is long)
- 2 nylon locking nuts with washers
- 2 regular nuts with locking washers
- 7 nylon spacers and 7 stainless steel screws
All of this was available at the local home improvement store for less than $30. The pre-existing holes in the metal rails meant that screwing down was easy, and also that we could secure the panel from walking away with a cable lock.
We’ve found this to be a great mounting situation. It’s a securable and safe place to put our panel while we’re driving, while still allowing the panel to charge the battery. It’s easy to pull out and set up the panel in the full sunshine, even if we are just stopped for lunch at a city park.
No matter how you choose to do your install, it’s likely that someone has done something similar before, or at least someone has made a mistake from which we can all learn. Many of these installers use a variety of components from different manufacturers, one benefit about going with Renogy is that all components are created to seamlessly integrate together -- it’s a one stop shop. So, grab your cordless drill and sealant applicator and get to it!
Shari Galiardi & David Hutchison have turned their higher education backgrounds, desire for life-long learning, and thirst for adventure travel into writing, photography, video production, and public speaking tours from coast to coast. Known to their friends as simply Shari & Hutch, you can learn more about their full-time, solar powered adventures on their website at freedominacan.com. Or, follow them on Facebook, Instagram, and YouTube as “Freedom in a Can.”


![Which Marine Battery is Right for You [2026 Guide]](http://ca.renogy.com/cdn/shop/articles/how-to-choose-marine-battery_5af35244-b269-4d22-8ef2-af84d70386ed.png?v=1777428541&width=460)