

Solar panels can help Canadian households reduce their reliance on grid electricity, but installing them is more involved than attaching modules to a roof. The right system depends on your home, electricity use, roof structure, local climate, provincial requirements and connection with the electricity distributor.
This guide explains how solar panel installation works in Canada, what to check before you buy, which permits and electrical standards may apply, and when the work should be handled by a qualified electrical contractor.
Quick answer: A grid-connected rooftop solar system should be designed and installed in accordance with the Canadian Electrical Code as adopted in your province or territory, local building requirements and the electricity distributor’s interconnection rules. Fixed wiring, service-panel work, roof modifications and grid connection should not be treated as casual DIY tasks.
Choose the right solar system first
The phrase “solar panel installation” can describe several different system types. Decide how you want to use the energy before selecting panels, an inverter or a battery.
| System type | How it works | Typical Canadian use | Important consideration |
|---|---|---|---|
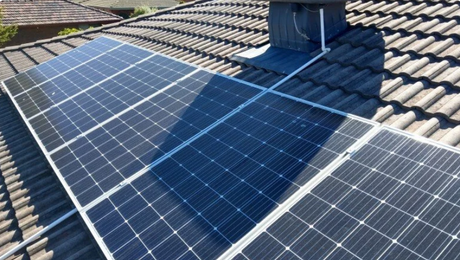
| Grid-connected rooftop solar | Solar panels feed a certified grid-interactive inverter. Your property uses available solar generation, while the grid supplies any shortfall. | Reducing electricity purchases at a home or small business | Usually requires permits, inspection and approval from the local electricity distributor before operation. |
| Stand-alone or off-grid solar | Panels charge a battery through a compatible charge controller. An inverter supplies selected AC loads when required. | Remote cabins, cottages, workshops and properties without a reliable grid connection | Winter energy production, battery capacity, generator integration and cold-weather protection must be planned carefully. |
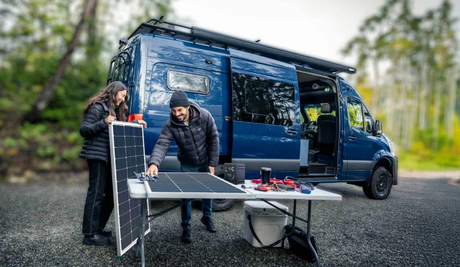
| Portable or RV solar | Portable panels charge a battery or power station through a compatible controller. | Camping, caravanning, seasonal travel and temporary outdoor power | This is not the same as a grid-interactive system and must not be connected to household wiring unless designed and approved for that purpose. |
A portable panel connected to a battery is not interchangeable with a rooftop system connected to a home’s electrical service. The inverter, wiring, protection equipment and approval pathway depend on the system architecture.
What to check before installing solar panels
1. Review your electricity use
Start with your electricity bills and record your average daily use in kilowatt-hours (kWh). Note when you use the most electricity. Electric heating, heat pumps, hot water, well pumps, pool equipment and vehicle charging can significantly affect the system size you need.
Also consider seasonal use. A cottage may have modest summer demand but need reliable battery capacity during shoulder seasons. A year-round home may need a different design because winter production is lower and heating loads are higher.
2. Inspect the roof and available sunlight
Review the usable roof area, roof age, roof covering, structural condition, shading and access. Trees, chimneys, neighbouring buildings and future construction can reduce output. If the roof will need replacement soon, complete that work before installing solar panels.
Unlike a simple “best direction” rule, Canadian solar design depends on latitude, roof pitch, shade and your electricity-use pattern. South-facing roof areas often receive strong annual sunlight, while east- or west-facing arrays may better match morning or afternoon demand. Your installer should model the actual roof rather than relying on a generic orientation recommendation.
Natural Resources Canada’s Photovoltaic Ready Guidelines also highlight roof structure, conduit routes, electrical-panel capacity and future system planning.
3. Check snow, ice, wind and roof loading
Canadian roofs must be assessed for local snow and ice conditions as well as the weight of the panels, racking and accumulated snow. In regions with high winds, confirm that the mounting design is suitable for local wind exposure.
Cold temperatures can increase a solar module’s open-circuit voltage. String sizing must therefore be checked against the inverter’s maximum DC voltage at the lowest expected temperature, not just under normal summer conditions.
4. Confirm property permissions
Homeowners may need a municipal building permit, electrical permit or inspection. Renters should obtain written permission from the landlord. Condo owners may need approval from a condo board or strata corporation, particularly when equipment is visible from the exterior or attached to a common roof.
Heritage properties, properties in special planning zones and homes in wildfire-prone areas may have additional requirements. The authority having jurisdiction (AHJ) in your area can confirm which permits and inspections apply.
5. Choose a qualified contractor
Canada does not have one nationwide solar-installer accreditation that replaces provincial electrical licensing. Ask the contractor which licence is required in your province, who will obtain the permits, who will submit the utility application and what inspection or acceptance document you will receive.
Request a site-specific design, an itemized quote, expected production, product and workmanship warranties, snow-load assumptions, equipment locations and a clear description of any required service-panel upgrades.
Canadian electrical codes and product approval
Canadian installations must follow the current electrical and building requirements adopted by the province, territory or municipality. Common references include:
- Canadian Electrical Code, CSA C22.1: The main electrical installation code, adopted and enforced through provincial or territorial rules.
- Photovoltaic installation requirements: Rules covering PV wiring, grounding, bonding, disconnects, overcurrent protection and equipment locations.
- Inverter and interconnection standards: Grid-interactive equipment must meet the applicable Canadian certification and utility requirements.
- Local building and structural requirements: These may cover roof loading, attachment details, snow, wind, fire and roof penetrations.
- Utility technical requirements: Each electricity distributor may set its own application, export, metering and inspection process.
Use panels, inverters, batteries, disconnects and mounting equipment that carry a certification mark accepted by the local authority. A product certified for the United States or another country is not automatically approved for use in Canada.
For example, some Canadian utility programs require grid-interactive inverters to comply with CSA C22.2 No. 107.1 and related interconnection requirements. Always check the exact model and the local distributor’s current qualified-equipment list before purchase.
Canadian residential service is commonly 120/240 V split-phase at 60 Hz. Do not import a product simply because its wattage and connector appear similar to a Canadian model. Voltage, frequency, certification, plug configuration and utility compatibility all matter.
What equipment does a solar installation need?
A typical system may include:
- Solar panels or photovoltaic modules
- Roof, ground or portable mounting hardware
- Solar-rated DC cable and compatible connectors
- A grid-interactive, hybrid or off-grid inverter
- Disconnects, overcurrent protection and other protective equipment
- A compatible solar charge controller for battery-based systems
- A battery and battery-management system where storage is required
- Monitoring equipment for production, battery status and system faults
Before connecting any equipment, match panel voltage and current to the inverter or charge controller. Confirm battery voltage, maximum solar input, wire size, connector type, temperature ratings and protection requirements. A connector that fits mechanically does not prove that two components are electrically compatible.
How to install solar panel in Canada
Step 1: Site assessment and system design
The contractor assesses the roof, structure, shading, snow and wind exposure, cable routes, electrical panel, meter and expected energy use. The design should identify the panel layout, inverter location, battery location if applicable, protective equipment and proposed connection method.
Step 2: Permits and utility application
Before installation, confirm the required municipal and electrical permits. For a grid-connected system, the electricity distributor may require a connection application, single-line diagram, inverter information, equipment certification and an approval before energization.
Do not purchase equipment based only on an online estimate if the utility has not accepted the proposed connection. Some distributors may require system changes or service upgrades after reviewing the application.
Step 3: Mounting and roof protection
Mounting hardware must suit the roof material, snow load, wind exposure and panel layout. Roof penetrations should be sealed correctly to prevent water ingress. On a flat roof, the installer must account for ballast, wind uplift, drainage and row-to-row shading.
Step 4: Panel placement and cable routing
Panels should be secured with compatible clamps or brackets. Cables must be protected from sharp edges, standing water, ice, UV exposure, animals and foot traffic. Keep connectors clean, dry and accessible for inspection.
Step 5: Electrical connection and protection
Electrical connections, service-panel work and fixed 120/240 V AC wiring must be completed according to the approved design, product instructions and applicable Canadian requirements. The installer checks polarity, voltage, grounding, bonding, disconnects and protective devices before energizing the system.
Do not work on live solar wiring. PV modules can produce electricity whenever they are exposed to light. Switching off part of the system does not necessarily make every DC conductor safe to touch.
Step 6: Inspection, commissioning and handover
After installation, the required authority or inspector reviews the work. The distributor then completes its connection or meter process where applicable. Keep copies of the permit, inspection or acceptance document, system design, equipment serial numbers, operating instructions and warranty information.
Design for Canadian winters and local conditions
- Snow accumulation: Confirm roof and racking capacity for local snow loads. Do not assume a panel will eliminate the need to consider snow on the roof.
- Ice and freeze-thaw cycles: Protect roof penetrations, cable routes and connectors from water entry and repeated temperature changes.
- Cold-weather voltage: Check the maximum string voltage at the lowest expected temperature.
- Battery charging: Follow the battery manufacturer’s low-temperature charging limits. Some batteries require a low-temperature cut-off or approved heating system.
- Wind and hail: Use mounting hardware and engineering appropriate to local exposure.
- Coastal environments: Consider salt exposure and corrosion-resistant mounting and cable-management materials.
- Short winter days: Size off-grid systems around the lowest expected solar resource, not only summer production.
- Roof access and safety: Keep panels, batteries and cables away from required fire access, vents, walkways and emergency equipment.
After installation: monitoring and maintenance
Monitor production through the inverter display or monitoring app. A sudden output drop may be caused by snow, shade, dirt, a loose connection, equipment limits or a system fault.
Never climb onto a snowy or icy roof to clean panels. If snow removal is recommended for your system, follow the manufacturer’s instructions or arrange professional service. Avoid metal tools that can damage module glass, cables or racking.
Arrange a professional inspection if you notice damaged insulation, loose mounting hardware, water ingress, unusual heat, burning smells, repeated inverter faults or battery alarms.
Common installation mistakes
- Choosing panels before calculating household or seasonal energy use.
- Ignoring snow load, roof condition, shade or cold-weather voltage.
- Using an inverter or battery that is not approved or compatible with the system.
- Assuming U.S. certification automatically means Canadian approval.
- Assuming a small system does not need a permit, inspection or utility approval.
- Using improvised mounting hardware or unprotected outdoor wiring.
- Confusing a portable battery system with a grid-interactive solar system.
- Relying on an old federal rebate or an outdated utility credit calculation.
- Attempting fixed AC wiring, service-panel changes or grid connection as a DIY project.
When should you call a professional?
Get qualified help for roof work at height, structural concerns, service-panel or meter work, fixed AC wiring, grid interconnection, battery installation, snow-load questions, remote off-grid design or any project where the applicable rules are unclear.
In Ontario, electrical contractors who offer installation services to the public must be licensed by the Electrical Safety Authority. Other provinces and territories have their own licensing and inspection systems. Use the authority and terminology that apply to the property where the system will be installed.
Final takeaway
The safest way to install solar panels in Canada is to match the system design to your electricity use, roof structure, climate and local connection rules. Use equipment approved for the Canadian market, follow the current code adopted in your province or territory, and involve a qualified electrical contractor for structural, fixed-wiring and grid-connected work.
For portable, RV, cabin and stand-alone applications, explore the current Renogy CA solar and off-grid range. Confirm the product’s intended use, Canadian specifications, certification, warranty and delivery availability before purchasing.
This article provides general educational information and is not a substitute for advice from a licensed electrical contractor, municipal building department, electricity distributor or provincial and territorial safety authority. Codes, permits, utility programs, incentives, product listings and prices can change. Verify the current requirements before installation.


![Which Marine Battery is Right for You [2026 Guide]](http://ca.renogy.com/cdn/shop/articles/how-to-choose-marine-battery_5af35244-b269-4d22-8ef2-af84d70386ed.png?v=1777428541&width=460)